Continuous Deployment for AWS Glue

AWS Glue is a managed service for building ETL (Extract-Transform-Load) jobs. It’s a useful tool for implementing analytics pipelines in AWS without having to manage server infrastructure. Jobs are implemented using Apache Spark and, with the help of Development Endpoints, can be built using Jupyter notebooks. This makes it reasonably easy to write ETL processes in an interactive, iterative fashion. Once finished, the Jupyter notebook is converted into a Python script, uploaded to S3, and then run as a Glue job.

There are a number of steps involved in doing this, so it can be worthwhile to automate the process into a CI/CD pipeline. In this post, I’ll show you how you can build an automated pipeline using GitHub Actions to do continuous deployment of Glue jobs built on PySpark and Jupyter notebooks. The full code for this demo is available on GitHub.

The Abstract Workflow

First, I’m going to assume you already have a notebook for which you’d like to set up continuous deployment. If you don’t, you can take a look at my example, but keep in mind you’ll need to have the appropriate data sources and connections set up in Glue for it to work. This post won’t be focusing on the ETL script itself but rather the build and deployment pipeline for it.

I recommend treating your Jupyter notebooks as the “source code” for your ETL jobs and treating the resulting Python script as the “build artifact.” Though this can present challenges for diffing, I find providing the notebook from which the code was derived makes the development process easier, particularly when collaborating with other developers. Additionally, GitHub has good support for rendering Jupyter notebooks, and there is tooling available for diffing notebooks, such as nbdime.

With that in mind, the general flow of our deployment pipeline looks something like this:

  1. Upon new commits to master, generate a Python script from the Jupyter notebook.
  2. Copy the generated Python script to an S3 bucket.
  3. Update a Glue job to use the new script.

You might choose to run some unit or integration tests for your script as well, but I’ve omitted this for brevity.

The Implementation

As I mentioned earlier, I’m going to use GitHub Actions to implement my CI/CD pipeline, but you could just as well use another tool or service to implement it. Actions makes it easy to automate workflows and it’s built right into GitHub. If you’re already familiar with it, some of this will be review.

In our notebook repository, we’ll create a .github/workflows directory. This is where GitHub Actions looks for workflows to run. Inside that directory, we’ll create a main.yml file for defining our CI/CD workflow.

First, we need to give our workflow a name. Our pipeline will simply consist of two jobs, one for producing the Python script and another for deploying it, so I’ll name the workflow “build-and-deploy.”

name: build-and-deploy

Next, we’ll configure when the workflow runs. This could be on push to a branch, when a pull request is created, on release, or a number of other events. In our case, we’ll just run it on pushes to the master branch.

on:
  push:
    branches: [ master ]

Now we’re ready to define our “build” job. We will use a tool called nbconvert to convert our .ipynb notebook file into an executable Python script. This means our build job will have some setup. Specifically, we’ll need to install Python and then install nbconvert using Python’s pip. Before we define our job, we need to add the “jobs” section to our workflow file:

# A workflow run is made up of one or more jobs that can run
# sequentially or in parallel.
jobs:

Here we define the jobs that we want our workflow to run as well as their order. Our build job looks like the following:

build:
  runs-on: ubuntu-latest

  steps:
    # Checks-out your repository under $GITHUB_WORKSPACE, so your
    # job can access it
    - uses: actions/checkout@v2
        
    - name: Set up Python 3.8
      uses: actions/setup-python@v2
      with:
        python-version: '3.8'
          
    - name: Install nbconvert
      run: |
        python -m pip install --upgrade pip
        pip install nbconvert

    - name: Convert notebook
      run: jupyter nbconvert --to python traffic.ipynb

    - name: Upload python script
      uses: actions/upload-artifact@v2
      with:
        name: traffic.py
        path: traffic.py

The “runs-on” directive determines the base container image used to run our job. In this case, we’re using “ubuntu-latest.” The available base images to use are listed here, or you can create your own self-hosted runners with Docker. After that, we define the steps to run in our job. This consists of first checking out the code in our repository and setting up Python using built-in actions.

Once Python is set up, we pip install nbconvert. We then use nbconvert, which works as a subcommand of Jupyter, to convert our notebook file to a Python file. Note that you’ll need to specify the correct .ipynb file in your repository—mine is called traffic.ipynb. The file produced by nbconvert will have the same name as the notebook file but with the .py extension.

Finally, we upload the generated Python file so that it can be shared between jobs and stored once the workflow completes. This is necessary because we’ll need to access the script from our “deploy” job. It’s also useful because the artifact is now available to view and download from the workflow run, including historical runs.

Now that we have our Python script generated, we need to implement a job to deploy it to AWS. This happens in two steps: upload the script to an S3 bucket and update a Glue job to use the new script. To do this, we’ll need to install the AWS CLI tool and configure credentials in our job. Here is the full deploy job definition, which I’ll talk through below:

deploy:
  needs: build
  runs-on: ubuntu-latest

  steps:
    - name: Download python script from build
      uses: actions/download-artifact@v2
      with:
        name: traffic.py
          
    - name: Install AWS CLI
      run: |
        curl "https://awscli.amazonaws.com/awscli-exe-linux-x86_64.zip" -o "awscliv2.zip"
        unzip awscliv2.zip
        sudo ./aws/install
          
    - name: Set up AWS credentials
      shell: bash
      env:
        AWS_ACCESS_KEY_ID: ${{ secrets.AWS_ACCESS_KEY_ID }}
        AWS_SECRET_ACCESS_KEY: ${{ secrets.AWS_SECRET_ACCESS_KEY }}
      run: |
        mkdir -p ~/.aws
        touch ~/.aws/credentials
        echo "[default]
        aws_access_key_id = $AWS_ACCESS_KEY_ID
        aws_secret_access_key = $AWS_SECRET_ACCESS_KEY" > ~/.aws/credentials
          
    - name: Upload to S3
      run: aws s3 cp traffic.py s3://${{secrets.S3_BUCKET}}/traffic_${GITHUB_SHA}.py --region us-east-1
      
    - name: Update Glue job
      run: |
        aws glue update-job --job-name "Traffic ETL" --job-update \
"Role=AWSGlueServiceRole-TrafficCrawler,Command={Name=glueetl,ScriptLocation=s3://${{secrets.S3_BUCKET}}/traffic_${GITHUB_SHA}.py},Connections={Connections=redshift}" \
--region us-east-1
      
    - name: Cleanup
      run: rm -rf ~/.aws

We use “needs: build” to specify that this job depends on the “build” job. This determines the order in which jobs are run. The first step is to download the Python script we generated in the previous job.

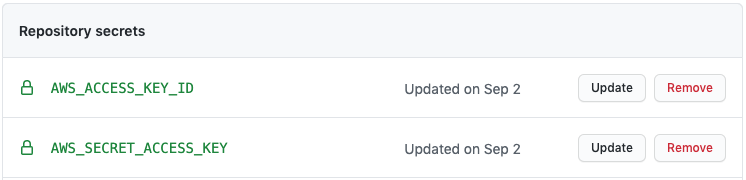
Next, we install the AWS CLI using the steps recommended by Amazon. The AWS CLI relies on credentials in order to make API calls, so we need to set those up. For this, we use GitHub’s encrypted secrets which allow you to store sensitive information within your repository or organization. This prevents our credentials from leaking into code or workflow logs. In particular, we’ll use an AWS access key to authenticate the CLI. In our notebook repository, we’ll create two new secrets, AWS_ACCESS_KEY_ID and AWS_SECRET_ACCESS_KEY, which contain the respective access key tokens. Our workflow then injects these into an ~/.aws/credentials file, which is where the AWS CLI looks for credentials.

With our credentials set up, we can now use the CLI to make API calls to AWS. The first thing we need to do is copy the Python script to an S3 bucket. In the workflow above, I’ve parameterized this using a secret called S3_BUCKET, but you could also just hardcode this or parameterize it using a configuration file. This bucket acts as a staging directory for our Glue scripts. You’ll also notice that I append the Git commit SHA to the name of the file uploaded to S3. This way, you’ll know exactly what version of the code the script contains and the bucket will retain a history of each script. This is useful when you need to debug a job or revert to a previous version.

Once the script is uploaded, we need to update the Glue job. This requires the job to be already bootstrapped in Glue, but you could modify the workflow to update the job or create it if it doesn’t yet exist. For simplicity, we’ll just assume the job is already created. Our update command specifies the name of the job to update and a long –job-update string argument that looks like the following:

Role=AWSGlueServiceRole-TrafficCrawler,Command={Name=glueetl,ScriptLocation=s3://${{secrets.S3_BUCKET}}/traffic_${GITHUB_SHA}.py},Connections={Connections=redshift}

This configures a few different settings on the job, two of which are required. “Role” sets the IAM role associated with the job. This is important since it determines what resources your Glue job can access. “Command” sets the job command to execute, which is basically whether it’s a Spark ETL job (“glueetl”), Spark Streaming job (“gluestreaming”), or a Python shell job (“pythonshell”). Since we are running a PySpark job, we set the command name to “glueetl” and then specify the script location, which is the path to our newly uploaded script. Lastly, we set a connection used by the job. This isn’t a required parameter but is important if your job accesses any Glue data catalog connections. In my case, that’s a Redshift database connection I’ve created in Glue, so update this accordingly for your job. The Glue update-job command is definitely the most unwieldy part of our workflow, so refer to the documentation for more details.

The last step is to remove the stored credentials file that we created. This step isn’t strictly necessary since the job container is destroyed once the workflow is complete, but in my opinion is a good security hygiene practice.

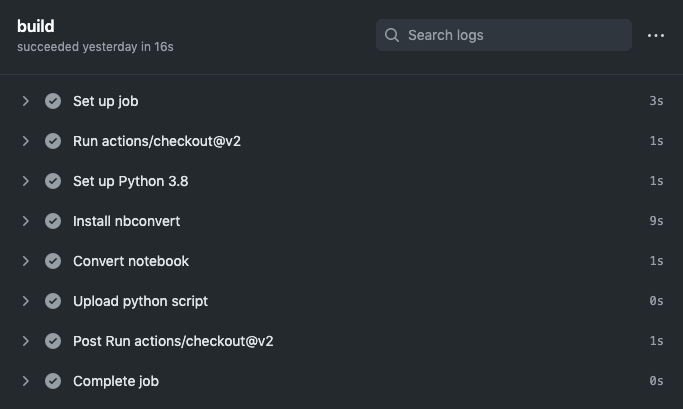
Now, all that’s left to do is see if it works. To do this, simply commit the workflow file which should kick off the GitHub Action. In the Actions tab of your repository, you should see a running workflow. Upon completion, the build job output should look something like this:

And the deploy output should look something like this:

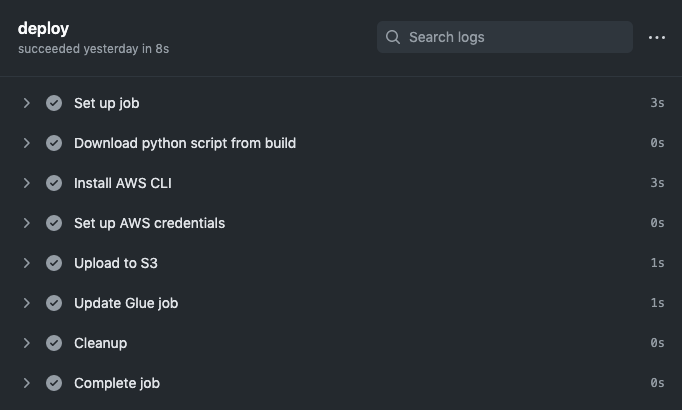
At this point, you should see your Python script in the S3 bucket you configured, and your Glue job should be pointing to the new script. You’ve successfully deployed your Glue job and have automated the process so that each new commit will deploy a new version! If you wanted, you could also extend this workflow to start the new job or create a separate workflow that runs on a set schedule, e.g. to kick off a nightly batch ETL process.

Hopefully you’ve found this useful for automating your own processes around AWS Glue or Jupyter notebooks. GitHub Actions provides a convenient and integrated solution for implementing CI/CD pipelines. With it, we can build a nice development workflow for getting Glue ETL code to production with continuous deployment.

Security by Happenstance

Key rotation, auditing, and secure CI/CD

Companies often require employees to regularly change their passwords for security purposes. PCI compliance, for example, requires that passwords be changed every 90 days. However, NIST, whose guidelines commonly become the foundation for security best practices across countless organizations, recently revised its recommendations around password security. Its Digital Identity Guidelines (NIST 800-63-3) now recommends removing periodic password-change requirements due to a growing body of research suggesting that frequent password changes actually makes security worse. This is because these requirements encourage the use of passwords which are more susceptible to cracking (e.g. incrementing a number or altering a single character) or result in people writing their passwords down.

Unfortunately, many companies have now adapted these requirements to other parts of their IT infrastructure. This is largely due to legacy holdover practices which have crept into modern systems (or simply lingered in older ones), i.e. it’s tech debt. Specifically, I’m talking about practices like using username/password credentials that applications or systems use to access resources instead of individual end users. These special credentials may even provide a system free rein within a network much like a user might have, especially if the network isn’t segmented (often these companies have adopted a perimeter-security model, relying on a strong outer wall to protect their network). As a result, because they are passwords just like a normal user would have, they are subject to the usual 90-day rotation policy or whatever the case may be.

Today, I think we can say with certainty that—along with the perimeter-security model—relying on usernames and passwords for system credentials is a security anti-pattern (and really, user credentials should be relying on multi-factor authentication). With protocols like OAuth2 and OpenID Connect, we can replace these system credentials with cryptographically strong keys. But because these keys, in a way, act like username/passwords, there is a tendency to apply the same 90-day rotation policy to them as well. This is a misguided practice for several reasons and is actually quite risky.

First, changing a user’s password is far less risky than rotating an access key for a live, production system. If we’re changing keys for production systems frequently, there is a potential for prolonged outages. The more you’re touching these keys, the more exposure and opportunity for mistakes there is. For a user, the worst case is they get temporarily locked out. For a system, the worst case is a critical user-facing application goes down. Second, cryptographically strong keys are not “guessable” like a password frequently is. Since they are generated by an algorithm and not intended to be input by a human, they are long and complex. And unlike passwords, keys are not generally susceptible to social engineering. Lastly, if we are requiring keys to be rotated every 90 days, this means an attacker can still have up to 89 days to do whatever they want in the event of a key being compromised. From a security perspective, this frankly isn’t good enough to me. It’s security by happenstance. The Twitter thread below describes a sequence of events that occurred after an AWS key was accidentally leaked to a public code repository which illustrates this point.

To recap that thread, here’s a timeline of what happened:

  1. AWS credentials are pushed to a public repository on GitHub.
  2. 55 seconds later, an email is received from AWS telling the user that their account is compromised and a support ticket is automatically opened.
  3. A minute later (2 minutes after the push), an attacker attempts to use the credentials to list IAM access keys in order to perform a privilege escalation. Since the IAM role attached to the credentials is insufficient, the attempt failed and an event is logged in CloudTrail.
  4. The user disables the key 5 minutes and 58 seconds after the push.
  5. 24 minutes and 58 seconds after the push, GuardDuty fires a notification indicating anomalous behavior: “APIs commonly used to discover the users, groups, policies and permissions in an account, was invoked by IAM principal some_user under unusual circumstances. Such activity is not typically seen from this principal.”

Given this timeline, rotating access keys every 90 days would do absolutely no good. If anything, it would provide a false sense of security. An attack was made a mere 2 minutes after the key was compromised. It makes no difference if it’s rotated every 90 days or every 9 minutes.

If 90-day key rotation isn’t the answer, what is? The timeline above already hits on it. System credentials, i.e. service accounts, should have very limited permissions following the principle of least privilege. For instance, a CI server which builds artifacts should have a service account which only allows it to push artifacts to a storage bucket and nothing else. This idea should be applied to every part of your system.

For things running inside the cloud, such as AWS or GCP, we can usually avoid the need for access keys altogether. With GCP, we rely on service accounts with GCP-managed keys. The keys for these service accounts are not exposed to users at all and are, in fact, rotated approximately every two weeks (Google is able to do this because they own all of the infrastructure involved and have mature automation). With AWS, we rely on Identity and Access Management (IAM) users and roles. The role can then be assumed by the environment without having to deal with a token or key. This situation is ideal because we can avoid key exposure by never having explicit keys in the first place.

For things running outside the cloud, it’s a bit more involved. In these cases, we must deal with credentials somehow. Ideally, we can limit the lifetime of these credentials, such as with AWS’ Security Token Service (STS) or GCP’s short-lived service account credentials. However, in some situations, we may need longer-lived credentials. In either case, the critical piece is using limited-privilege credentials such that if a key is compromised, the scope of the damage is narrow.

The other key component of this is auditing. Both AWS and GCP offer extensive audit logs for governance, compliance, operational auditing, and risk auditing of your cloud resources. With this, we can audit service account usage, detect anomalous behavior, and immediately take action—such as revoking the credential—rather than waiting up to 90 days to rotate it. Amazon also has GuardDuty which provides intelligent threat detection and continuous monitoring which can identify unauthorized activity as seen in the scenario above. Additionally, access credentials and other secrets should never be stored in source code, but tools like git-secrets, GitGuardian, and truffleHog can help detect when it does happen.

Let’s look at a hypothetical CI/CD pipeline as an example which ties these ideas together. Below is the first pass of our proposed pipeline. In this case, we’re targeting GCP, but the same ideas apply to other environments.

CircleCI is a SaaS-based CI/CD solution. Because it’s deploying to GCP, it will need a service account with the appropriate IAM roles. CircleCI has support for storing secret environment variables, which is how we would store the service account’s credentials. However, there are some downsides to this approach.

First, the service account that Circle needs in order to make deploys could require a fairly wide set of privileges, like accessing a container registry and deploying to a runtime. Because it lives outside of GCP, this service account has a user-managed key. While we could use a KMS to encrypt it or a vault that provides short-lived credentials, we ultimately will need some kind of credential that allows Circle to access these services, so at best we end up with a weird Russian-doll situation. If we’re rotating keys, we might wind up having to do so recursively, and the value of all this indirection starts to come into question. Second, these credentials—or any other application secrets—could easily be dumped out as part of the build script. This isn’t good if we wanted Circle to deploy to a locked-down production environment. Developers could potentially dump out the production service account credentials and now they would be able to make deploys to that environment, circumventing our pipeline.

This is why splitting out Continuous Integration (CI) from Continuous Delivery (CD) is important. If, instead, Circle was only responsible for CI and we introduced a separate component for CD, such as Spinnaker, we can solve this problem. Using this approach, now Circle only needs the ability to push an artifact to a Google Cloud Storage bucket or Container Registry. Outside of the service account credentials needed to do this, it doesn’t need to deal with secrets at all. This means there’s no way to dump out secrets in the build because they will be injected later by Spinnaker. The value of the service account credentials is also much more limited. If compromised, it only allows someone to push artifacts to a repository. Spinnaker, which would run in GCP, would then pull secrets from a vault (e.g. Hashicorp’s Vault) and deploy the artifact relying on credentials assumed from the environment. Thus, Spinnaker only needs permissions to pull artifacts and secrets and deploy to the runtime. This pipeline now looks something like the following:

With this pipeline, we now have traceability from code commit and pull request (PR) to deploy. We can then scan audit logs to detect anomalous behavior—a push to an artifact repository that is not associated with the CircleCI service account or a deployment that does not originate from Spinnaker, for example. Likewise, we can ensure these processes correlate back to an actual GitHub PR or CircleCI build. If they don’t, we know something fishy is going on.

To summarize, requiring frequent rotations of access keys is an outdated practice. It’s a remnant of password policies which themselves have become increasingly reneged by security experts. While similar in some ways, keys are fundamentally different than a username and password, particularly in the case of a service account with fine-grained permissions. Without mature practices and automation, rotating these keys frequently is an inherently risky operation that opens up the opportunity for downtime.

Instead, it’s better to rely on tightly scoped (and, if possible, short-lived) service accounts and usage auditing to detect abnormal behavior. This allows us to take action immediately rather than waiting for some arbitrary period to rotate keys where an attacker may have an unspecified amount of time to do as they please. With end-to-end traceability and evidence collection, we can more easily identify suspicious actions and perform forensic analysis.

Note that this does not mean we should never rotate access keys. Rather, we can turn to NIST for its guidance on key management. NIST 800-57 recommends cryptoperiods of 1-2 years for asymmetric authentication keys in order to maximize operational efficiency. Beyond these particular cryptoperiods, the value of rotating keys regularly is in having the confidence you can, in fact, rotate them without incident. The time interval itself is mostly immaterial, but developing this confidence is important in the event of a key actually being compromised. In this case, you want to know you can act swiftly and revoke access without causing outages.

The funny thing about compliance is that, unless you’re going after actual regulatory standards such as FedRAMP or PCI compliance, controls are generally created by the company itself. Compliance auditors mostly ensure the company is following its own controls. So if you hear, “it’s a compliance requirement” or “that’s the way it’s always been done,” try to dig deeper to understand what risk the control is actually trying to mitigate. This allows you to have a dialog with InfoSec or compliance folks and possibly come to the table with better alternatives.

Introducing InfinitumFramework.com

rendering

Here’s a dose of shameless self-promotion. It’s coming up on a year since I started development on Infinitum, and I’m targeting its first full release on its birthday, February 11. Shortly before I moved the project to GitHub, they deprecated the downloads service, so I needed to fine a home for distributing the binaries as well as the Javadoc.

GitHub offers its pages service, but I figured I’d just host it myself. I threw together a website in a couple days and the result is www.infinitumframework.com. This website will be used to host the latest (and previous) releases of the framework, its documentation, and, in the future, announcements and updates for it.

Stay tuned as Infinitum approaches its first official release!

Modularizing Infinitum: A Postmortem

In addition to getting the code migrated from Google Code to GitHub, one of my projects over the holidays was to modularize the Infinitum Android framework I’ve been working on for the past year.

Infinitum began as a SQLite ORM and quickly grew to include a REST ORM implementation,  REST client, logging wrapper, DI framework, AOP module, and, of course, all of the framework tools needed to support these various functionalities. It evolved as I added more and more features in a semi-haphazard way. In my defense, the code was organized. It was logical. It made sense. There was no method, but there also was no madness. Everything was in an appropriately named package. Everything was coded to an interface. There was no duplicated code. However, modularity — in terms of minimizing framework dependencies — wasn’t really in mind at the time, and the code was all in a single project.

The Wild, Wild West

The issue wasn’t how the code was organized, it was how the code was integrated. The project was cowboy coding at its finest. I was the only stakeholder, the only tester, the only developer — judge, jury, and executioner. I was building it for my own personal use after all. Consequently, there was no planning involved, unit testing was somewhere between minimal and non-existent, and what got done was at my complete discretion. Ultimately, what was completed any given day, more or less, came down to what I felt like working on.

What started as an ORM framework became a REST framework, which became a logging framework, which became an IOC framework, which became an AOP framework. All of these features, built from the ground up, were tied together through a context, which provided framework configuration data. More important, the Infinitum context stored the bean factory used for storing and retrieving bean definitions used by both the framework and the client. The different modules themselves were not tightly coupled, but they were connected to the context like feathers on a bird.

infinitum-arch

The framework began to grow large. It was only about 300KB of actual code (JARed without ProGuard compression), but it had a number of library dependencies, namely Dexmaker, Simple XML, and GSON, which is over 1MB combined in size. Since it’s an Android framework, I wanted to keep the footprint as small as possible. Additionally, it’s likely that someone wouldn’t be using all of the features in the framework. Maybe they just need the SQLite ORM, or just the REST client, or just dependency injection. The way the framework was structured, they had to take it all or none.

A Painter Looking for a Brush

I began to investigate ways to modularize it. As I illustrated, the central problem lay in the fact that the Infinitum context had knowledge of all of the different modules and was responsible for calling and configuring their APIs. If the ORM is an optional dependency, the context should not need to have knowledge of it. How can the modules be decoupled from the context?

Obviously, there is a core dependency, Infinitum Core, which consists of the framework essentials. These are things used throughout the framework in all of the modules — logging, DI ((I was originally hoping to pull out dependency injection as a separate module, but the framework relies heavily on it to wire up components.)), exceptions, and miscellaneous utilities. The goal was to pull off ORM, REST, and AOP modules.

My initial approach was to try and use the decorator pattern to “decorate” the Infinitum context with additional functionality. The OrmContextDecorator would implement the ORM-specific methods, the AopContextDecorator would implement the AOP-specific methods, and so on. The problem with this was that it would still require the module-specific methods to be declared in the Infinitum context interface. Not only would they need to be stubbed out in the context implementation, a lot of module interfaces would need to be shuffled and placed in Infinitum Core  in order to satisfy the compiler. The problem remained; the context still had knowledge of all the modules.

I had another idea in mind. Maybe I could turn the Infinitum context from a single point of configuration to a hierarchical structure where each module has its own context as a “child” of the root context. The OrmContext interface could extend the InfinitumContext interface, providing ORM-specific functionality while still inheriting the core context methods. The implementation would then contain a reference to the parent context, so if it was unable to perform a certain piece of functionality, it could delegate to the parent. This could work. The Infinitum context has no notion of module X, Y, or Z, and, in effect, the control has been inverted. You could call it the Hollywood Principle — “Don’t call us, we’ll call you.”

infinitum-context-hierarchy

There’s still one remaining question: how do we identify the “child” contexts and subsequently initialize them? The solution is to maintain a module registry. This registry will keep track of the optional framework dependencies and is responsible for initializing them if they are available. We use a marker class from each module, a class we know exists if the dependency is included in the classpath, to check its availability.

Lastly, we use reflection to instantiate an instance of the module context. I used an enum to maintain a registry of Infinitum modules. I then extended the enum to add an initialize method which loads a context instance.

The modules get picked up during a post-processing step in the ContextFactory. It’s this step that also adds them as child contexts to the parent.

New modules can be added to the registry without any changes elsewhere. As long as the context has been implemented, they will be picked up and processed automatically.

Once this architecture was in place, separating the framework into different projects was simple. Now Infinitum Core can be used by itself if only dependency injection is needed, the ORM can be included if needed for SQLite, AOP included for aspect-oriented programming, and Web for the RESTful web service client and various HTTP utilities.

We Shape Our Buildings, and Afterwards, Our Buildings Shape Us

I think this solution has helped to minimize some of the complexity a bit. As with any modular design, not only is it more extensible, it’s more maintainable. Each module context is responsible for its own configuration, so this certainly helped to reduce complexity in the InfinitumContext implementation as before it was handling the initialization for the ORM, AOP, and REST pieces. It also worked out in that I made the switch to GitHub ((Now that the code’s pushed to GitHub, I begin the laborious task of migrating the documentation over from Google Code.)) by setting up four discrete repositories, one for each module.

In retrospect, I would have made things a lot easier on myself if I had taken a more modular approach from the beginning. I ended up having to reengineer quite a bit, although once I had a viable solution, it actually wasn’t all that much work. I was fortunate in that I had things fairly well designed (perhaps not at a very high level, but in general) and extremely organized. It’s difficult to anticipate change, but chances are you’ll be kicking yourself if you don’t. I started the framework almost a year ago, and I never imagined it would grow to what it is today.